This sassy little chipmunk likes to sit on our fence and chirp at the world. Here he is in the middle of one of his rants.
Make sure you turn up your volume to hear the barrage of chirps.
And Other Bad Words
This sassy little chipmunk likes to sit on our fence and chirp at the world. Here he is in the middle of one of his rants.
Make sure you turn up your volume to hear the barrage of chirps.
After tailgating Meghan for the length of our street, over a mile, dumbass passes her on the left when she slows down to make a left-hand turn.
Notice in the video that a) she’s driving the speed limit, b) her left-turn indicator was on, and c) there’s no right turn anywhere near there – it’s all trees – so there’s no way the truck’s driver made an honest mistake.

 Sunsets are coming earlier now…
 Different day, different location on Silver Lake, same beautiful colors. Plus bonus swan family.

Mama Woodchuck is not up to having guests at her family’s garden party…
Inflation is high, making electricity expensive.
Our dryer died, I’m lazy, and the repairman is expensive.
But worst of all, humanity is polluting the world in crazy ways. We collectively need to cut back on how much energy we use so we don’t make the planet uninhabitable for ourselves. Climate change is expensive.
Enter the humble clothesline. Two posts and a post-hole digger. 150 feet of cotton rope, three tensioners, and six pulleys. Fifty clothespins. About an hour of solid effort.
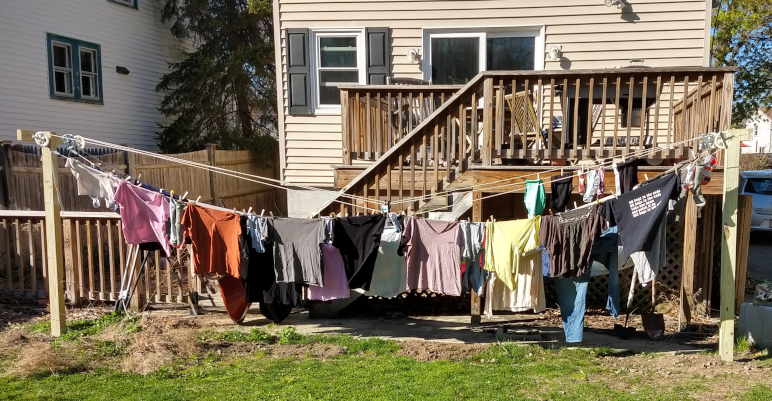
It’s a small thing, but it neatly solves three problems at once. Plus, the clothes smell nice afterwards!

After two years, much of the world seems to have given up on keeping a pandemic posture. I haven’t touched on COVID-19 in the blog in a while because I find it to be so frustrating. In the United States we’ve had strong anti-vax, anti-mask, and anti-science movements. They’ve really hampered efforts to “flatten the curve” of hospitalizations and keep COVID-19 from overwhelming the healthcare system.
Infection and hospitalization rates have dropped recently, so even the most vigilant have relaxed. Few people wear masks into stores; most employers are cajoling people back on-site. If there is going to be another resurgence of the virus, now is the time.
So, of course, the entire family is now COVID-19 positive.
We fell in a fairly orderly fashion: Megh, Alpha, me, Beta, one per day. The only family member not affected appears to be Butter-the-dog. I don’t know how to even tell if she is infected, but there’s evidence that she can. So far she seems fine.
We think we’ve traced it back to an outdoor event the past weekend in Concord to re-enact the “Battle Road” from the American Revolution. There was a crowd, and not everyone was masking – sadly, including us.
There have been a number of COVID-19 variants, and we seem to have caught a fairly recent one, Omicron, based on both the speed of infection and nature of symptoms. It’s been fairly mild for us overall.
We also visited Baba on Sunday, after infection but before contagiousness. Megh has been feeling guilt over the possibility of infecting her, but (so far) she has tested negative and seems fine. After this much time it’s unlikely she’ll contract it from us.
As a side note: my boss Terry, and his mother, also both tested positive for COVID-19 this week. I work from home so it’s just coincidental timing.
There are several ways to do this, but my Google-fu may be weak because it took me much too long to figure this out.
I want to recursively delete directories with a specific name (or names) within directory structure, UNLESS the matched directory contains a sentinel file.
In my case I want to make a C# directory structure “cleaner-than-clean” by removing all ‘bin’ and ‘obj’ directories, leaving just the user-generated files behind. This is pretty easy to achieve:
#!/bin/env bash

dir=/path/to/project

find $dir -type d \
    \( -name 'bin' -o -name 'obj' \)
    -print
This says “find things under $dir that are directories (-type d) and are named either ‘bin’ (-name 'bin') or (-o) named ‘obj’ (-name 'obj'). The parentheses force the two -name statements to be considered as a single condition, so the effect is to return true if either item matches. If the final result is true then print the path.
Notice that I’ve escaped (\) the parentheses because I’m using bash. Most UNIX shells do require these to be escaped, but yours may not. I’ve also terminated each line by escaping it. A single-line command may be spread over several lines this way, making it easier to read.
‘bin’ is also the conventional name for a directory of non-build executables, like helper scripts. I do have some, including this cleaner-than-clean cleaning script that I’m working out, and don’t want to delete those by accident. The above command would find them, if they were in the directory tree.
find allows you to prune (-prune) the search tree, ignoring selective directories, according to certain criteria but it doesn’t support the concept of peeking into sub-directories. Bummer.
You may, however, execute independent commands (-exec) and use the results of those commands to affect find‘s parameters, including -prune. We can exec the test command, which can tell us if our sentinel file exists.
#!/bin/env bash

dir=/path/to/project
sentinel=.keep

find "$basedir" \
    -type d \
    \( -name bin -o -name obj \) \
    ! -exec test -e "{}/$sentinel" ';' \
    -print
The new line executes test to see if the current path ({}) contains a file called $sentinel (I’ve defined $sentinel to be .keep but any filename will do), which returns true if it exists. The line is negated (!) so if the sentinel is found further actions are skipped.
The final step is to actually delete the directory. We call rm -Rf (-R = recursive, -f = force) because we just want the whole thing gone, no questions asked. The trailing plus (+) tells find that rm can accept multiple paths in a single call, rather than calling rm once for each path.
#!/bin/env bash

dir=/path/to/project
sentinel=.keep

find "$basedir" \
    -type d \
    \( -name bin -o -name obj \) \
    ! -exec test -e "{}/$sentinel" ';' \
    -print \
    -exec rm -Rf '{}' \+